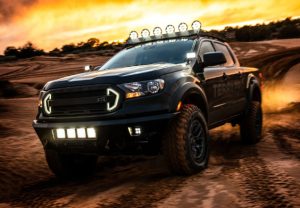
Off-road driving brings adventure, thrill, and freedom — but it also demands preparation, especially when the sun goes down. Visibility becomes critical for safety, navigation, and performance. That’s where a well-equipped lighting setup comes in. Proper lighting is not just about aesthetics; it’s about functionality, terrain awareness, and avoiding hazards.
In this article, we’ll explore best practices for off-road lighting, review the most popular lighting upgrades, and provide expert guidance on placement, installation, and legal considerations. Whether you’re hitting the trails, dunes, or forest paths, this guide will illuminate the road ahead.
Why Off-Road Lighting Matters
Unlike urban roads, off-road environments are unpredictable. Rocks, dips, water crossings, and wildlife can appear suddenly. Standard headlights aren’t designed to cover wide angles, vertical drops, or side terrain.
Key reasons to upgrade lighting:
-
Increased visibility in total darkness
-
Improved reaction time to obstacles
-
Enhanced safety for group driving
-
Stylish personalization of your 4×4, ATV, or truck
Best Practices for Off-Road Lighting
Here are essential tips to ensure effective and safe lighting upgrades:
1. Layer Your Lighting
Use a combination of flood, spot, and ambient lighting for full coverage. Each serves a specific purpose.
2. Mind the Beam Pattern
Avoid over-lighting close to the vehicle, which reduces contrast further away. Choose long-range beams for distance and wide beams for trailside illumination.
3. Install at Multiple Angles
Roof-mounted, bumper-mounted, and side-mounted lighting work together to eliminate blind spots.
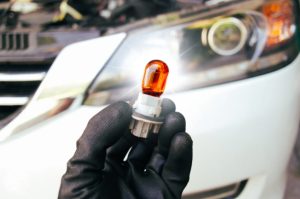
4. Use Quality Wiring & Switches
Cheap wires or DIY harnesses can cause overheating and failure. Invest in waterproof, vibration-resistant components.
5. Check Legal Requirements
Some lights are not street-legal. Use protective covers or install cut-off switches to stay compliant when returning to public roads.
Types of Off-Road Lights and Their Uses
| Light Type | Purpose | Recommended Location |
|---|---|---|
| LED Light Bars | Wide and/or long-range illumination | Roof, grille, bumper |
| Spot Lights | Focused, long-distance lighting | Bumper, A-pillars |
| Flood Lights | Broad light spread for side terrain | Roof corners, side mirrors |
| Rock Lights | Illuminate terrain under tires | Underbody, wheel wells |
| Ditch Lights | Illuminate side ditches and close objects | Hood corners or A-pillars |
| Rear Work/Chase Lights | Visibility for reversing or trail groups | Rear bumper or roof |
LED vs. Halogen vs. HID for Off-Roading
| Feature | Halogen | HID (Xenon) | LED |
|---|---|---|---|
| Brightness | Moderate | Very Bright | Very Bright |
| Durability | Prone to breakage | Sensitive to vibration | Excellent for rough use |
| Power Consumption | High | Moderate | Low |
| Lifespan | Short | Medium | Long (30,000+ hours) |
| Warm-up Time | Instant | 3-5 seconds | Instant |
| Cost | Low | Medium | Medium to High |
Best Overall Choice: LED lights, thanks to their brightness, instant response, vibration resistance, and efficiency.
Top Add-Ons for Off-Road Lighting
Below are some must-have lighting accessories and upgrades for serious off-roaders:
1. Light Bars
-
Available in straight or curved forms
-
Sizes range from 6″ to 52″
-
Combo beam options (spot + flood)
2. Rock Lights
-
Mounted in wheel wells or underbody
-
Help during crawling or night-time tire changes
-
Often come in RGB (color-changing) options
3. Ditch Lights
-
Perfect for illuminating tight trail edges
-
Small but powerful pods mounted on A-pillars
4. Rear Chase Lights
-
Increase visibility in dusty or foggy conditions
-
Useful for convoy communication via flashing signals
5. Scene or Area Lighting
-
Used during campsite setups or recovery operations
-
Typically mounted on roof racks or tailgates
Sample Lighting Configuration: Trail-Ready SUV Setup
| Position | Recommended Light | Purpose |
|---|---|---|
| Roof | 40” Curved Combo LED Light Bar | Long-range and peripheral vision |
| A-Pillars | 3” Ditch Spot Lights | Trail edge visibility |
| Front Bumper | 20” Flood Light Bar | Close-range trail lighting |
| Rear Bumper | Dual LED Pods | Reverse/camp lighting |
| Underbody | Rock Lights (RGB Optional) | Terrain and tire positioning |
Installation & Wiring Tips
-
Use relays and fuses to protect your circuits
-
Mount with vibration-resistant brackets
-
Waterproof all connectors
-
Label switches clearly in the cabin
-
Run wires through split loom tubing to prevent abrasion
Maintenance Tips
Even rugged lights need care. Here’s how to extend their life:
-
Clean lenses regularly to prevent fogging or yellowing
-
Inspect mounts after every rough trail session
-
Check wiring for wear or exposure
-
Tighten loose bolts to avoid light misalignment
-
Use protective covers when not off-roading
Common Mistakes to Avoid
Over-lighting without purpose – Creates glare or reflection off hoods
Cheap mounts or wiring kits – Leads to premature failure
Improper beam angles – Can reduce your ability to see obstacles
Forgetting local laws – Some states require covers on off-road lights
Final Thoughts
The right lighting setup transforms your off-road experience from basic to bold. It’s not just about making your rig look cool—it’s about creating a safer, more functional environment for tackling dark trails, navigating obstacles, and helping others.
Whether you’re overlanding across deserts, climbing rocky slopes, or night-crawling through forests, don’t leave your lighting to chance.
Buy Car Lighting online — explore a wide range of LED bars, pods, mounts, and accessories designed for extreme off-road conditions.
Quick Checklist for Off-Road Lighting Upgrades
LED light bars for distance and flood coverage
Rock and ditch lights for close-range awareness
Rear chase lights for team safety
Waterproof wiring, relays, and labeled switches
Mounted lights angled properly
Covers or cut-off switches for street legality
Lighting is your most powerful tool after dark — make sure it’s up to the challenge.